


15 Smartphone Photography Tips to Instantly Improve your Installation Photos

Views: 9,732Share This:


Sales growth can be directly linked to marketing that utilizes high-quality photography. Photographs help potential clients visualize how your product or service will impact them. While hiring a professional photographer to capture your plant installations is ideal, that isn’t always an option for a small business budget. Luckily, you can still drive sales without investing in professional photography or your own fancy camera equipment. And the even better news? You probably have everything you already need in the palm of your hand—literally.
The technology built into smartphone cameras is capable of taking really great photos if you know how to use it right. Below, I share a few tips that will help you instantly improve your smartphone photography.
Please note that my intent was to cover only the basics in this article. Most photos found below have only been slightly edited.
iPhone vs Android
 Let’s just get this out of the way. If you are using an Android phone, you have two options. Throw it in the trash, upgrade to an iPhone, and continue reading, or search for a different article. I’m only going to be covering the far superior iPhone here (wink).
Clean Your Lens
This might seem like a no-brainer, but I’m willing to bet this is something that happens seldom to never. At least, I know I’m guilty. I throw my phone in my purse, in my pocket, leave it on tables, and oftentimes let my sticky-fingered kiddo play with it. Cleaning your lens before taking a photo can absolutely make a difference in the resulting image.
Turn on Auto HDR
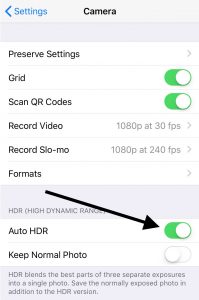 HDR, or High Dynamic Range, combines different exposures into one shot, allowing you to better capture images with high lighting contrasts. Maybe you are trying to capture an amazing plant display that is situated near a bright window. Without HDR enabled, you’re likely to end up with a picture of a plant silhouette. HDR will attempt to balance this high contrast scene by lightening the foreground without over-exposing the photo. How do you determine when you need HDR? You don’t. Just turn on Auto HDR by opening your settings, tapping camera, and toggling on Auto HDR. For the most part, your iPhone will do a great job of deciding whether HDR is needed or not and automatically enable/disable the feature. If you have reservations, there is also an option to keep both the original and the HDR photo.
Turn off the Flash
The iPhone’s flash can cause strange hues, harsh shadows, and often washes out details with its intense, direct beam of light. Instead, try shooting your subject in its environment’s natural lighting when possible.
Lock the Focus & Set the Exposure
Don’t let your camera determine the subject for you. As smart as these “smartphones” are, they don’t always get it right. Tap and hold your subject until you see the yellow AE/AF Lock alert. If you need to change your subject, simply tap elsewhere in the frame to unlock your focus.
I talked above about losing the flash and using an environment’s natural lighting, but what if that environment is too dark? Once you have locked your focus, a “sun” symbol will appear to the side of your focus box. Swipe up to increase (make the photo brighter) or down to decrease (make the photo darker) the exposure. This is perfect for challenging lighting conditions where your subject is dark and creates an incorrect auto exposure.

Resist the Urge to Zoom
Instead of using the camera zoom to get closer to your subject, zoom with your feet. iPhone camera zoom can cause quality loss and have other negative effects on a photo. If it is impossible to move yourself closer to the subject, it’s better to take the shot without zoom and crop the image later. Below are two pictures that were taken just seconds apart. Camera zoom was used to capture the image on the left, while the image on the right was taken without zoom and cropped later. Notice the difference?
Reduce Camera Shake
Camera shake can result in blurry photos and is more typical in low-light settings. In order to compensate for the low light condition, the iPhone’s camera will many times use a longer exposure to grab hold of as much light as possible. This requires you to hold completely still or risk a shaky image. In order to reduce camera shake, be sure to hold your phone in the same fashion you would a normal camera, with two hands. Hold your elbows in tight to your body, rest them on a table, or lean against a vertical surface as a way to brace yourself. If you want to really eliminate that shake, you can invest in a tripod made specifically for smartphones.
Use the Volume Button
 This is a great shortcut that every iPhone user needs to know. While holding your phone similar to an actual camera, use the volume button to snap a photo and avoid the camera shake that comes with trying to tap that digital shutter button. Try it. You’ll thank me later.
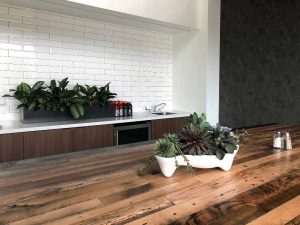
Preemptively Remove Clutter
Be mindful of what is in the background of your photo. Clutter can easily cause a photo to lose its visual appeal. The picture below was taken in our breakroom, as is. While it’s not a huge distraction, the Gatorade and salt and pepper shakers aren’t really adding anything to the image, and they are so easily removed. Take the time to remove things that take focus away from your subject prior to shooting the photo. It’s much faster than trying to edit them out later.

Adjust Your Camera Angle
Try moving around your subject to find the most pleasing angle. Don’t just settle for the first place you stand. The angle from which you shoot makes a tremendous difference in the outcome of the photo. Below is the perfect example of just how much angle can affect your image. In the photo on the left, not only is the plant silhouetted due to the bright background, but the red car, garden hose, and even the apartment building are a distraction. By simply placing that large window to my back, I was able to produce a much more balanced photo that keeps your eyes focused where I want them—on the plant.


Know the Rule of Thirds
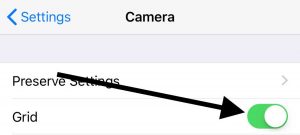 Understanding the “rule of thirds” will help you create well-balanced shots. First, you will want to enable the grid feature on your camera. To do this, open your settings, tap camera, and toggle on grid. Once enabled, you’ll see that your screen is now divided into thirds both horizontally and vertically. Research tells us that when viewing images, people naturally focus on one of the intersection points rather than the center of the photo. Placing a tall planter on the vertical line or a long planter on the horizontal line will result in a more interesting and eye-pleasing shot.
How to Choose Landscape or Portrait Mode

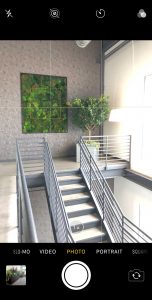
This is something that is often determined by utilizing the “rule of thirds,” which I covered above. If you are struggling to find an interesting shot in one mode, it’s likely that you will find it in the other. These are examples of how the grid can help you compose your shot in both the landscape and portrait modes.

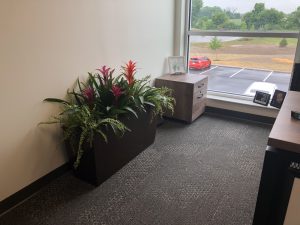
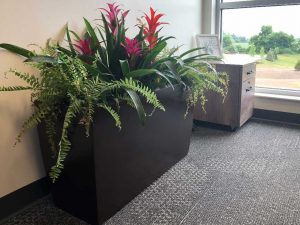
Adjust the Camera Height
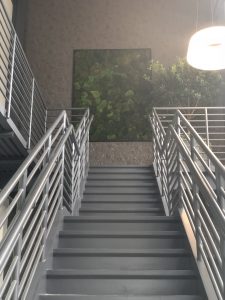
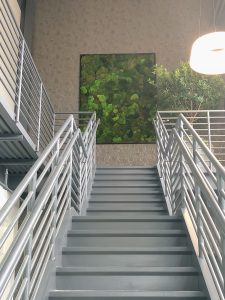
Don’t limit yourself to taking photos at standing height. Sometimes shooting from a low angle on your knees or a higher angle on a step ladder can produce a more interesting perspective. The picture on the left was shot from standing height. The angle caused the parking lot in the background to be visible, taking focus away from the planter. I took the picture on the right from a kneeling position. The subject is clear with few distractions. I was tempted to do a teensy bit of editing to add a slight blur to the background here to further emphasize the subject, but ultimately decided to keep it simple and focus on the importance of the camera height.
Watch Your Lines
This is a common mistake I see. While there will always be some degree of lens distortion causing imperfect lines, when a shot is obviously “off line” it can really spoil the image.
Have Some Fun with Editing Apps
With so many photo editing apps out there, it can be hard to know where to start. Here are a few of my favorites and some of the features I enjoy. Get in there and play around with some different apps to figure out what works for you. The important thing to remember here is not to over-edit. The best edits are subtle and work to enhance the subject.
- Snapseed (for beginners)
- One-tap editing filters
- Photo enhancements and lens blurs
- Large collection of editing tools, yet still user friendly
- Enlight (for more advanced users)
- Huge collection of editing tools and artist effects
- Built-in masking tool applies effects only to selected portions of the image
- More control over exposure, color, and other details
Views: 9,732Share:

Melanie is a plant enthusiast and expert contributor at Bromeliads.info and OrchidPlantCare.info. Melanie's experience in internet marketing, business management, and horticulture allows her to bring a unique perspective to the community. Melanie received a Bachelor's degree in Organizational Leadership from Purdue University and is the Marketing Director at NewPro Containers.

You May Also Like


Leave a Reply
You must be logged in to post a comment.

